Sunday 11 August 2013

Heavy Metal Character - Change to Anatomy

Well I showed some of my initial work to some colleagues and whilst supporting, one mentioned that for such a comical idea why not have comical proportions. And whilst I was trying to avoid recreating Brutal Legend's protagonist with big burly arms, I did quite like the idea and thought I could still create a bigger character, whilst avoiding the 2 appearing too similar.


So I began by creating a base mesh for use within mudbox that I would be able to manipulate and sculpt to create the character I wanted. I also used the swift loop tool within 3DS Max to make sure that the model had enough geometry for me to use within mudbox.

Base mesh


1st Sculpt Pass, excluding head

So far I think it's going quite good, my muscle definition has improved however currently the arms do look as if they are rather stuck on rather than attached.


Heavy Metal Character - Start

Well it dawned on me that I haven't had much of a productive summer this year, not as much as I would have liked at any rate.

Whilst yes, I have learnt lots about using Mudbox and the importance of anatomy within 3D modelling, and I have gone through lots of tutorials, I don't have a finished project that I can show off. That is the aim of this project.

I hope to create a heavy metal character wielding a guitar with a massive guitar amp on his back, sort of strapped together and possibly rigged and posed.

Original Concept


I figured this project would also be great practice for the human anatomy as well as the 3DS Max - Mudbox workflow.

Initial Model

Wednesday 7 August 2013

Hard Surface Attempt Mk III

 Beginning to make sense of it all I think, I just took the time this morning to do something simple like a medieval helmet. just 3 flat sides meeting at a point.

Before flattening
I mostly just used the bulge and wax tools to build up the geometry after defining the point with the sculpt tool, and then used the other 2 tools to build up the rest of the geometry to meet it. Finally I used the pinch tool to define the edges a little bit more. Worked rather well.

After flattening
However at the end of the day, all I have are 3 flat face which should be a poly each and only take seconds to make within 3DS Max, as opposed to the 2 hours it took me to do this..

Tuesday 6 August 2013

Head Sculpt II

Today's speed sculpt of 1 hour. Worked on it without any references or help from tutorials or anything, I just went for it and tried to remember everything I'd learnt in the past.

Despite it all I am happy with it and definitely had more fun working on my own as opposed to having a tutorial video play at the same time.


..my eye!


Things to work on, everything a wee bit, noses and lips and eyes more so. Didn't bother with the ears either  as they just seemed too pointless to do since they don't vary much.


+5 Anatomy Knowledge

Well it was my birthday not too long ago and i got myself a how to draw anatomy book, and it has really helped.

Granted the result of sculpting with it open (seen below) isn't totes amaze balls but I'm still quite happy with it and it is a huge improvement.


Hard Surface Attempt Mk II

Once again I attempted some hard surface sculpting within mudbox with my resolve renewed. Totally could've gone better but hey. I tried and learnt some new tricks too.

This.. thing, for lack of a batter word was meant to be a big robot looking creature with smooth metal panels and massive air intakes on the chest there. That is no what they turned out to be. I watched a video whilst working on this and you can see how it was meant to turn out.


Front
 I suppose I have improved somewhat but I am still determined to nail down hard surface modeling, some day. However I am starting to consider zbrush more and more now especially after watching the intro video to a new eat3D tutorial video that uses, guess what? zbrush and it does seem to have some very useful tools.

Back

Maybe next time I'll get something nailed down right..

Monday 5 August 2013

Head Sculpt I

I intend to make this a daily thing where I sculpt out a head in roughly an hour. I learnt a lot from this piece even if the eyes are seriously messed up looking, like a sphinx or something right?


I would quite like to improve in this field as the face is where the player looks, and so it is important to be highly detailed. Furthermore it's also the main area that would give off who that character is and what they're like.

Take this guy for instance, he looks like he's fake and unbelievable, but aside from that, he looks quite alert with his freakishly wide open eyes.

Hard Surface Attempt

I absolutely love modeling with mudbox compared to 3ds Max, you just get so much more freedom in what you are doing. However it is very difficult to get hard edged shapes down and from what I can gather it is also rather difficult to do hard surface modelling within mudbox with zbrush suppossedly being the better program for such things.

An example of a hard surface model
However I do not have £400 odd lying around so I will make do with mudbox, not to mention mudbox's UI is so much simpler and I'm already very familiar with it so I might as well stick with it.

To begin with I made myself a little torso and head just so I could do a little practice on some armour or something.
 
 
I was also following this little youtube video series although a lot of it was presented in a, "here's something I did earlier" kinda way which wasn't very insightful, but nevertheless I tried my hand.


The result wasn't the best, though you can sorta see something coming through. Maybe with practice, or maybe with zbrush I'll actually create something very hard edged.


Friday 5 July 2013

Mudboxing - Keepin' Face!

The mudboxing continues, this time I tried my hand at a head and just went from there, it didn't turn out the best.


I initially started with a sphere, shaped it into a head and thought I'd mark out where the eyes nose and mouth would go, although I quickly realised I didn't have the geometry I needed to make the nose without subdividing it loads.

So I began again, only this time with the base head from mudbox and worked from there, those results weren't the best either. So once again I found myself heading over to youtube to find some tutorials.

I didn't find a tutorial as such but rather a guy going through his process of mudboxing a face and explaining the anatomy behind the face such as bones and muscles and how they shape the face which I found to be a great help.

Eyes = Winging it                                                                       Nose down = Tutorial

Ears are quite hard


The final head looked ok I thought, with the exception of the weirdly high up eyes and thought that I had done a good enough job with the muscles and bones etc. However after leaving it for an hour and coming back to it I think I should've exaggerated the features a little bit more, especially if the head was part of a much larger body.


After going back and lowering the eyes however the head did look a good bit better. Although wow those ears look horrific!  Still good practice I guess.

Mudboxing - T Rex

Been doing some mudboxing, just followed a tutorial series up on YouTube which was very good in getting the hang of the basics and it goes over all the sculpting tools, creating vector displacement maps, and painting.

The eyes turned out way more emotional than I had planned, hence the silly caption
I find mudbox to be hugely fun to work with, much more enjoyable than modeling withing 3DS Max, although you definitely have a lot more control within 3DS Max, and (correct me if I'm wrong) but you can't create new geometry, and so mudbox really does seem to be a tool for creating extra detail to an already made model. Although, I'd be very happy to work solely in mudbox if it was possible, it's very quick and very fun.

Again after painting the eyes still did not look very fierce
 The painting with mudbox is also very good, it has the main functions found within photoshop such as layers, masking, brush size and opacity changes. Reminded me a lot of painting my old 40k models back in the day.

difference between not using normal maps and using normal maps


Pose tools in mudbox are quite easy to use which is nice, although better poses can be achieved with a skeleton

The tutorial series then ended with a look at the pose tool, which can be quickly used to pose whatever it is you just created, it works very well and it's quite easy to use. Although rigging a mesh with a skeleton can get you much much greater results.


Thursday 4 July 2013

RTS Project Over

Well I'm sad to say that I was fired, or as I'd like to call it "let go". No I was fired,  head of the project wanted the game released as soon as possible and I simply wasn't able to texture quick enough for him as it really isn't my strongest area.

I remained professional of course and wished him luck with his project, no hard feelings and all that, and I won't be mentioning him at all by name.

Although I can't help but feel treated a tad unfairly. Hear me out now, don't get me wrong, I'm still a student, and I still have lots to learn and there's plenty of people out there who are better than me at what I do, and so it's completely understandable that I was replaced.

However I disliked the way in which I was fired, messaged on steam, saying yeah sorry but I'm afraid I'm gonna have to let you go. No verbal warnings, no "hey can you try and pick up the pace?", just boop, gone mate. Gone.

Still I remained friendly about it all, said hey, well I worked on this model for you for 10 hours yesterday, you might as well have it, yknow? This was the Town Centre model I did earlier. To which he responded, "no the other guy's already done that". So he's had this guy working away from him, behind my back, and not letting me know, just happily letting me waste my time. Just a tad unpleasant, to know I just wasted a day.

Cheers mate.

Although I guess this does mean I can focus on other personal things and take some time to learn mudbox and get some practice with it.

I would like to end this post though stating that while the whole firing process could've been smoother, I do wish these guys all the best.

Town Centre

Next I then began work on the Town Centre, the building that would be placed on top of the "Unclaimed Settlement", which the player would then be able to use to start building a new settlement.

Comparison of the Town Centre and Unclaimed Settlement

Added Pillers and more geometry to stay in line with the Greek Architecture


Finished model of the Town Centre, unwrapped with labels on the unwrap

Some Food Stalls
I wanted the Town Centre to have a lot more detail than the Unclaimed Settlement with a water fountain, food stalls, barrels and a lot more decor around the buildings.

The model can be viewed in 3D here

Saturday 29 June 2013

Thacthed Cottage, Finished

Below is the finished model for the RTS project in all it's splendor. I am quite happy with it and how low poly I was able to make it, although it is quite obvious that I have a tilable texture on the buildings and so perhaps a creeping bit of moss is in need to add some variation to the buildings to break up the patterns.

First version of the model presented in UDK

512x512 Diffuse

512x512 Normal Map

The model can be viewed on p3d

Next building to do will be the actual Town Centre itself.


Friday 28 June 2013

Thacthed Cottage, Texturing has begun!

So I have unwrapped my cottage and begun texturing it starting with the thatched roof, which is quite difficult as it turns out.


512x512


Thursday 27 June 2013

What I've been up to

Since my moment of silence I have been contacted by a lovely fellow by the name of Kruma on the interweb to help him in create an RTS game built on the Source engine. My role in this endeavor will be to create the buildings that the player can use to assemble their base. Still isn't character design , although I am ready to leap at any opportunity to get some experience under my belt of working within a team, meeting deadlines and ultimately have the ability to say, "yes I worked on this", and hopefully I will be proud to say so.

The game in a nutshell is an Age of Empires 2 clone however the placement of towncentres is limited to only a few locations as they must be built on top of old abandoned buildings.

Which leads me to the first model I have made for this project, an old thatched cottage to act as the abandoned building.

The blue cylinder represents a person, just to maintain scale throughout

Hopefully it'll turn out alright.

Long Time No Post v0.1

So I haven't posted in a while unfortunately due to other responsibilities as well as a small smidge of laziness on my part, to which I apologise to you dear reader. Probably my only reader, hell I probably don't have any and only say these things to boost my ego.

Anyway, gave up on the noob challenge, the concept art wasn't terribly exciting and it made very little sense for me to be doing environmental stuff when I want to focus on character design.

Friday 17 May 2013

Noob Challenge 7, More Progress

Been continuing onwards with the Foliage Tutorial from the lovely 3DMotive guys a little bit more today, very very cool stuff indeed.

I firstly quickly textured my leaves as I knew that they were going to be painted onto the tree branches. This result left many of the leaves faces odd angles and generally not quite right so I went through each of them to fix em up and make them look right which took some time and a lot of tweaking and I hope it turns out that it's all worth it.

Leave Diffuse

Tree Wireframe

Tree Render 1

Tree Render 2
Quite happy with how they've turned out and I hope they look great in the end, although I might revisit the diffuse of the leaves as they look a bit desaturated. Only I don't think I actually can with the process I'm going through.

Or rather I could but I would have to select each individual leaf and apply the material to it.

Really enjoying the challenge so far and I have learnt quite a lot from it already. Foliage aside, I've learnt that I really really need to manage my time more carefully, maybe even draw up a plan of what I aim to achieve at the end of each day or week.

As it stands there's exactly 2 weeks left for the challenge and I've the gatehouse and walls modeled and unwrapped and the foliage I'm currently working on, however the ground still remains to be seen to. Hopefully all will be well.

Wednesday 15 May 2013

Noob Challenge 7 Progress

Unfortunately due to other responsibilities it has been some days since I was able to get back into flow with the Polycount noob challenge.

Spent a day unwrapping the gatehouse I had modeled previously. A whole day. Seems like a waste but it is necessary and perhaps it is something I could look into speeding up.

Today I then began working my way through 3DMotive's Foliage Tutorial series which has an amazing looking end product, although I do have to question some of the methods. Methods such as creating the grass using TurboSmoothed objects for grass and then replicating them and editing them to be unique before generating several maps from it such as colour variation and highlights which were then placed onto a low poly plane. There was nothing with the result, however the whole time I kept on thinking to myself, "I could just paint this in photoshop". Although I have enjoyed it and I've learnt a lot so far and I'm possibly only half way through the tutorial series such as branching within 3DS Max to quickly great branches or tendrils or anything like that and I'm quickly becoming a fan of using the FFD modifiers to quickly modify objects slightly.

So I'm currently in the process of making some trees, I have just finished making my first branch and my 4 leaf variations with them all unwrapped (although lazily)leaving me to paint them on next which I;m excited to learn.

Leaves Unwrap

Grass Render

Grass Wireframe

A branch


Thursday 9 May 2013

Polycount's Noob Challenge 7

I've been part of the Polycount forum for a little while now and it really is a great forum to be a part of. Full of very very talented people all with good critics and advice and are always happy to help which is very handy for anyone still learning and improving.

For a while I've seen "Noob Challenges" appear on the forum once a month as people recreate a piece of concept artwork in a fully fledged 3d environment representing it. Unfortunately I've never quite been able to take the time to do one as I've been quite busy with uni, however now that I'm off for summer I thought I'd try my hand at it.


Above is this month's concept piece, not quite sure where it's from but it is quite lovely. During this challenge many of the participants set certain goals aside for themselves to achieve such as learning something new or improving in a certain area.

I'll be happy to get it done, especially since I started into it 9 days late, silly me. However this piece will still be very good practice for creating realistic foliage as well as texturing, for which I think I will use hand painted textures.

Below is what I've managed to achieve after day 1, which I am quite happy with. Next step I think will be the walls and possibly mudboxing the terrain.


And here is how it looks within UDK.


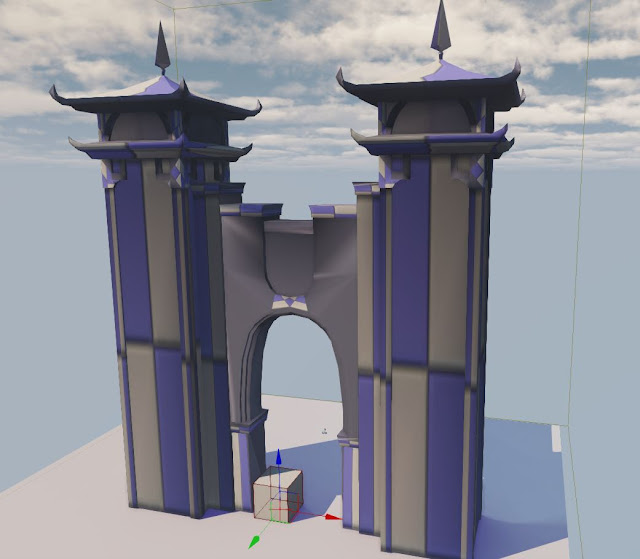
I will have to remember to create some custom lightmaps for this mesh as well as you can seen the tris on the central gate house.

Greetings

Hey Everyone,

Since I have lots of free time on my hands over summer I figured I would create a blog to post my work in progress pics that I prefer to keep of more serious sites.

My aim to is be able to look back at this blog come September and be able to see progression and improvements in my work as the Games Industry is highly competitive and I'm simply not good enough for it, and I could be entering it (or trying to) within a year or 2.

Within further delay then, my first model to grace this blog.
 

br brrrrrrrrrrrrrrrrr br br

I found a rather interesting mini tutorial on high-poly modelling using turbosmooth which I wanted to experiment with, I thought it was very interesting and left me with quite a nice result.

Although as can clearly be seen there is some texture stretching which is something I usually avoid, however it is still something I need to work on.